This chapter contains the following topics:
Selection, Payments and Checks/Direct Deposit Overview
Selecting Vouchers for Payment
Print Checks (Process Direct Deposit ACH) and Post
Resetting the Check Number in Cash Accounts
Prepare payments and print checks contains the functions needed for processing vendor payments. This chapter explains how to select vouchers, verify your selections, print checks, print direct deposit remittances / create an ACH file and post payment information to history and distributions.
Several selection functions are included to provide flexibility in choosing the vouchers to be paid. The selection functions include:
You may select one or more groups of vouchers to be fully paid, using various selection criteria including A/P account and vendor payment group.
You may select specific vouchers one at a time. You can specify full or partial payment for each voucher. You can cancel individual voucher selections in graphical mode.
If you selected one or more groups of vouchers for payment, but want to defer payment of some individual vouchers within that group, you may do so here.
Deferrals from payment can be either temporary (defer for this payment run only) or permanent (defer until the voucher is specifically selected through Select individual vouchers).
If vouchers have been previously selected for payment or temporarily deferred from payment, this function clears such selections and deferrals. It does not clear permanent deferrals.
This function is usually run, if needed, before Select a group of vouchers to clear selections and temporary deferrals, or if an error was made in the selection process.
Methods of selecting vouchers can be combined.
For example, you can select one or more groups of vouchers to be paid. You can also individually select several additional vouchers not in these groups.
You can then individually defer from payment some of the vouchers that have been selected.
This selection prints an edit list of your selected vouchers for any needed corrections. This report shows exactly what checks are printed for the vouchers that have been selected. It is a complete preview of your next payment and post run.
Print checks and post and Process direct deposit ACH and post
These functions do the following:
| • | Print computer checks for selected vouchers |
| • | For selected vouchers print remittances while generating a direct deposit ACH file for submission to your bank |
| • | Void any checks or direct deposit payments that do print okay or are incorrect. Read the caution note, later in this chapter, if you are automatically interfaced with Check Reconciliation. You may also use Void checks to do this later |
| • | Print an A/P Check Register |
| • | Print a Direct Deposit Register |
| • | Post the checks and payments. |
The A/P Check Register includes the computer checks just printed, direct deposit ACH payments just generated, as well as manual checks and non-A/P checks entered and posted since the last time the A/P Check Register was printed. Manual checks and non-A/P checks for all cash accounts, not just the one used during check printing, are posted
Positive pay
If you are using Positive Pay, an Accounts Payable Positive Pay Register is also printed immediately following the check printing. A positive pay register will not print for direct deposit ACH payments.
This Non A/P/Manual check register selection, found under Reports, prints a check register that includes only manual and non-A/P checks. Otherwise, these checks will appear on the A/P Check Register when computer checks and direct deposit payments are posted
Select
Select a group of vouchers from the Prepare payments menu.
This selection lets you select one or more groups of vouchers to be fully paid.
This is used to select a group of vouchers for payment all at once. For a discussion of this and other selection methods, see the Selection, Payments and Checks/Direct Deposit Overview section in this chapter. For example, you can select all past due vouchers and all current vouchers, but no optional vouchers. Past due, current and optional vouchers are defined at the beginning of this chapter.
Deferred vouchers or vouchers for vendors with a status of Hold payment are not selected. See the Vendor status field in the Vendors chapter.
The status of vouchers that have already been selected does not change. All vouchers selected here are paid in full.
However, if a partial payment was made previously for one of these selected vouchers, only the remaining balance is paid, including any valid discount.
If you want to make a partial payment on a specific voucher, you must use Select individual vouchers.
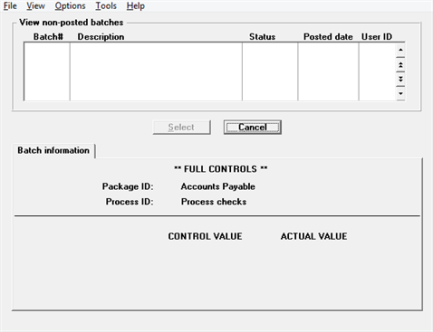
Batch Control
If you are using Batch controls a screen appears at this point for you to select the appropriate batch. Here is an example of the screen in graphical mode:
You may select a batch that has been previously entered or (if you have menu permission) setup a new batch after selecting Batch totals (Enter) from the Options menu. Setting up a new batch is only available in graphical mode.
For more specific information on this setting up and using this feature, refer to Using Batch Controls in the System User documentation.
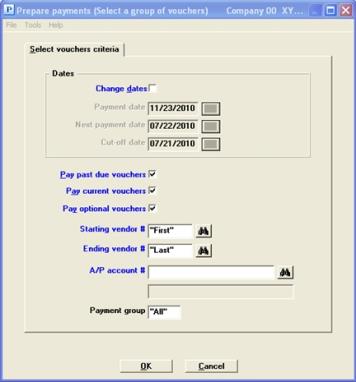
Graphical Mode
The following screen appears:
Menu Selections
At the top left of the screen menu selections are available. Most of these are the same from screen to screen. Some of these selections may be restricted. If the menu selection is grayed out, then you will not be able to access it. The selections that are unique to this screen are explained here:
Under the Print menu you may select Aged open items, Cash disbursement projections, Cash requirements, Open payables by date, Purchase journal, Purchases/Discounts, Vendor history, Vendor by vendor number and Vendor by vendor name.
Character Mode
The following screen appears:
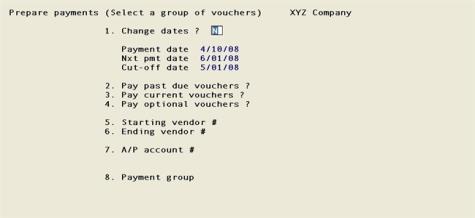
Enter the following information:
Change dates
If your last action before selecting this screen was anything other than the Select a group of vouchers selection or the Cash Requirements selection, this field displays as Enter dates. The three date subfields are blank, and the cursor moves through them in succession to allow entry of all three dates.
If your last action before selecting this screen was to utilize one of these selections, the dates you entered at that time are displayed and this field displays as Change dates. If you check this box, the cursor moves to Pay past due vouchers field and the displayed dates are accepted. If you uncheck the box, the cursor moves through the three date subfields in succession and lets you accept or change each date.
|
Format |
Checked is yes and unchecked is no. The default is unchecked |
|
Example |
Select <Enter> to use the dates you entered in the example in the previous chapter |
Payment date
Next Payment date
Cut-off date
For an explanation of these terms, refer to the explanation at beginning of the Cash Requirements chapter.
|
Format: |
MMDDYY at each subfield |
|
Example: |
(The cursor does not move to these subfields in this example because you answered N to Change dates?) |
Pay current vouchers
Pay optional vouchers
Based on the dates in the fields above, vouchers are divided into three categories:
| • | Past due means that the voucher’s due date is before the payment date. |
| • | Current means that the voucher’s due date is on or after the payment date, but before the next payment date (your next check printing run). A current voucher must be paid to avoid becoming due prior to the next check printing run. It may or may not be eligible for discount. |
| • | Optional means that the voucher’s due date is on or after the next payment date, and the voucher’s discount date is on or after the payment date but before the next payment date. An optional voucher does not fall past due before the next payment date, but the discount is lost if payment is postponed until then. |
Your answers to these three fields determine which category or categories you wish to select. Any combination of checked and unchecked (Y and N in character mode) is accepted; however unchecking all three fields guarantees that nothing will be selected.
|
Format |
Checked is yes and unchecked is no. The default is checked |
|
Example |
Press <Enter> at each field to accept the default |
Starting vendor #
Ending vendor #
Options
Enter the range of vendors whose vouchers are to be selected. Neither vendor is required to be entered, but the range should enclose at least one vendor. You may use one of the options:
|
<F2> |
For the First starting vendor or Last ending vendor |
|
<F1> |
For the next vendor |
|
<SF1> |
For the previous vendor. |
|
<F8> |
For selecting a vendor from a list a vendors. From the vendor list window you may select the More info button to view the full data about the vendor. You may also access vendor history from the Options menu |
|
Format |
6 characters for each field |
|
Example |
Press <F2> for each field |
Options
Enter the A/P account number for the vouchers you wish to select. This must be an existing entry in A/P accounts. You may use one of the options:
|
<F1> |
For the next entry in A/P accounts |
|
<SF1> |
For the previous entry |
|
<F2> |
For the default A/P account from Control information |
|
<F5> |
For "All" vouchers regardless of A/P account |
|
Format |
Your standard account number format, as defined in Company information |
|
Example |
Press <F5> |
Options
Enter the payment group of the vendors whose vouchers are to be selected, or use the option:
|
<F5> |
To select "All" vouchers regardless of which payment group if any the vendor belongs to. |
|
Format |
3 characters |
|
Example |
Press <F5> |
You may leave this field blank, in which case vouchers will be selected only for those vendors who do not belong to any payment group.
Make any needed changes. Select OK or select Cancel to not select any vouchers for payment.
There will be a period of processing as individual vouchers are examined and selected. No report is printed. Any vouchers that are already selected remain selected (whether or not they meet the conditions you have entered on this screen). Any vouchers for which a modification is pending (in Open items (Modify)) are not selected. See Modifying Open Items.
This lets you select individual vouchers for full or partial payment. Refer to the chapter introduction for related selections.
Select
Select individual vouchers from the Prepare payments menu.
For character mode see Character Mode.
The following screen appears:
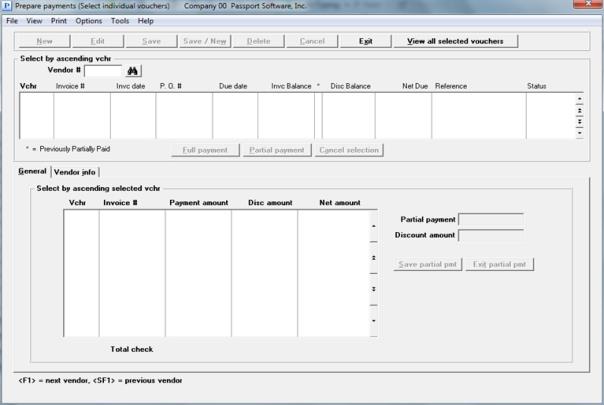
From this screen for individual vouchers, you can select full payments, select partial payments and cancel selections.
Select Individual Vouchers List Boxes
The upper list box lists up to 6 vouchers at a time. The lower list box displays the selected vouchers for the selected vendor. When a list box is selected, the lines in the list box turn from black to blue and specific fields can be sorted.
For both list boxes, you may sort the vouchers by voucher number in ascending or descending order. Only column names in red may be sorted. Click on the column name or the arrow to the right of the column name to change the sort or use the View options.
You may use one of these options to find the voucher:
|
<F1> or Down arrow |
For the next voucher in voucher number order |
|
<SF1> or Up arrow |
For the previous voucher |
|
<Page Down> |
To move to the next group of vouchers |
|
<Page Up> |
To move to the previous group of vouchers |
|
End |
To move to the last voucher |
|
Home |
To move to the first voucher |
Menu Selections
At the top left of the screen menu selections are available. Most of these are the same from screen to screen. Some of these selections may be restricted. If the menu selection is grayed out you will not be able to access it. The selections that are unique to this screen are explained here:
From the Print menu you may select the Pre-check writing report, Aged open items, Cash disbursement projections, Cash requirements, Open payables by date, Purchase journal, Purchases/Discounts, Vendor history, Vendor by vendor number and Vendor by vendor name.
From the Options menu you may View All Selected Vouchers. In addition you may access other functions such as entering vendor notes, View Open Items and Viewing Vendor Invoices.
Selecting Individual Vouchers
You must first select a vendor. Enter the following information:
Vendor #
Options
This is the vendor number for the voucher. Enter the number or use the option:
|
<F1> |
For next vendor |
|
<SF1> |
For the previous vendor |
|
<F8> |
For selecting a vendor from a list a vendors. From the vendor list window you may select the Enter vendor button to view, edit, add or delete a vendor. You may also access vendor history from the Options menu |
|
Format |
6 characters |
|
Example |
Type 200 |
The open item vouchers display in the upper list box. This is the voucher number to be selected. The voucher number entered must match a voucher for this vendor in A/P Open Items. If the voucher has been previously deferred, the type of deferral is displayed.
Options
Enter the number, or use one of the options:
|
<F1> or Down arrow |
Next voucher for this vendor |
|
<SF1> or Up arrow |
For the previous voucher for this vendor |
Vouchers for which there is a modify transaction (in Open items) may not be selected. If you really mean to select this open item, post or delete the modification first.
Select this button to pay the net amount of the invoice in full.
Credit vouchers must always be paid in full. A credit voucher has a negative invoice amount. If you answer Yes, the invoice net amount is selected for payment, provided the invoice is still eligible for a discount (the payment date is not later than the discount date of the voucher. If the discount period has expired, the invoice balance amount is paid instead of the discount balance.
|
Format |
Button. |
|
Example |
Select the full payment button |
Select this button to pay part of the payable.
Enter the following information:
Save partial pmt (button)
Exit partial pmt (button)
Options
This is the amount of the partial payment for the voucher. The amount cannot be greater than the invoice balance, nor can it be negative or zero. Enter the amount, or use the option:
|
<F2> |
For the invoice balance |
When you finish entering this field you may either enter the discount amount, select the Save partial pmt button or if you do not want to save your entry, select the Exit partial pmt button.
|
Format |
999,999,999.99- |
|
Example |
Type 800 |
Options
Enter the discount to take on the partial payment. The discount cannot be greater than the amount to pay above. You can also use the option:
|
<F2> |
For the discount balance (if any) |
|
Format |
99,999,999.99- |
|
Example |
Type 5 |
Select this button to cancel a previously selected payable.
Selected Vouchers List Box
There are five columns in the Selected Vouchers list box. Three columns include totals fields that display at the bottom of the screen. Here is a description of each field:
Vchr #
This column includes the voucher numbers.
Invoice #
The invoice numbers display in this column.
Payment amount
This is the selected invoice total amount. If a partial payment is being made, this column reflects the partial payment amount. The total payment amount displays under the column. This number increases for each voucher selected for payment.
Disc amount
This is the selected discount amount. If a partial payment is being made, this column reflects the partial discount amount. The totals display under the column. This number increases for each vouchers selected for payment.
Net amount
The net is the amount to pay less discount to take. The total net would become the vendor check amount. This number increases for each voucher selected for payment.
Select
View all selected vouchers from the Options menu or click on the View all selected vouchers button.
This screen is only available in Graphical mode.
From this screen you may view the all the selected vouchers. The totals for Payment amount, Discount amount and Net amount also display. You may also cancel individual vouchers by selecting the voucher and then click on the Cancel selection button. Here is an example of this screen:
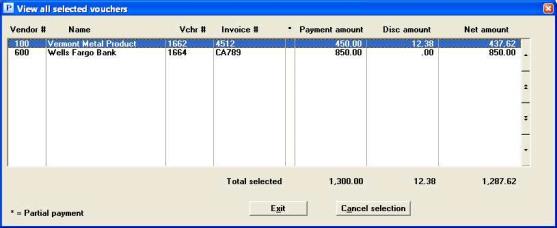
When finished viewing and canceling selections, click on the Exit button to go back to the Select individual vouchers screen.
View Selected Vouchers List Box
The list box lists up to 16 selected vouchers at a time. You may sort the vouchers by vender number in ascending or descending order. Only column names in red may be sorted. Click on the column name or the arrow to the right of the column name to change the sort or use the View options.
To locate a voucher, start typing a vendor number. You may also use the up/down arrows, Page up, Page down, Home and End keys to locate an item. The <F1> and <SF1> keys are the same as the up/down arrow keys.
Clicking on the Cancel button cancels the selected voucher and removes that voucher from the next payment run.
In character mode, the following screen displays:
Selecting Individual Vouchers
Vendor #
Options
This is the vendor number for the voucher. Enter the number or use the option:
|
<F1> |
For next vendor |
|
<SF1> |
For the previous vendor |
|
<F8> |
For selecting a vendor from a list a vendors. From the vendor list window you may select the Enter vendor button to view, add, edit or delete a vendor. You may also access vendor history from the Options menu |
|
Format |
6 characters |
|
Example |
Type 200 |
The open item vouchers display in the upper list box. This is the voucher number to be selected. The voucher number entered must match a voucher for this vendor in A/P Open Items. If the voucher has been previously deferred, the type of deferral is displayed.
Options
Enter the number, or use one of the options:
|
<F1> or Down arrow |
Next voucher for this vendor |
|
<SF1> or Up arrow |
For the previous voucher for this vendor |
You will be asked if this is the Right voucher ?. If you enter N you will be take back to the Voucher # field. When you select Y this screen appears like this when entering a partial payment:
Make any needed changes. Press <Enter> to select this voucher.
In character mode, selected vouchers cannot be unselected, but you can defer payment either temporarily or permanently as described in the next section.
If a voucher that you select for payment has been permanently deferred, Permanently Deferred displays to the right of the voucher number. You can override this deferral, after confirming that you really want to do so.
This selection is used to defer specific vouchers from payment, either temporarily or permanently.
Temporary deferral is used in conjunction with Select a group of vouchers to designate vouchers not to be paid on the next check printing run. After check printing, the temporary deferral status can be cleared automatically.
Permanently deferred vouchers are deferred until they are specifically selected for payment through Select individual vouchers. You might want to permanently defer a disputed invoice until such a dispute is resolved.
|
Note |
If you have a voucher that is partially paid and the remainder will never be paid, you may enter an offsetting voucher (negative amount) in payables to get the balance to zero. Print a check for a zero amount. |
Select
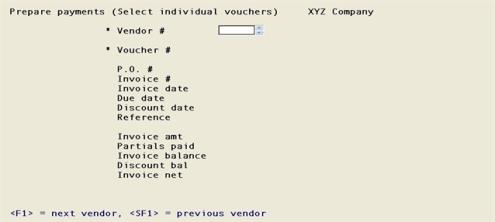
Defer vouchers from payment from the Prepare payments menu.
A screen appears for you to enter the following information:
This is the vendor number for the deferral.
|
Format |
6 characters. The default is the same vendor as on the previous deferral (if any) |
|
Example |
Type 100 |
The upper list box lists up to 6 vouchers at a time and displays all the vouchers for the selected vendor. The lower list box displays the vouchers selected for payment for the vendor selected. When a list box is selected, the lines in the list box turn from black to blue and specific fields can be sorted.
For both list boxes, you may sort the vouchers by voucher number in ascending or descending order. Only column names in red may be sorted. Click on the column name or the arrow to the right of the column name to change the sort or use the View options.
To locate a voucher, start typing the voucher number. You may also use the up/down arrows, Page up, Page down, Home and End keys to locate a voucher. The <F1> and <SF1> function the same as the up/down arrow keys.
Vouchers that display in the upper list box are available for deferral.
Two buttons are active on this screen:
| Button | Keyboard | Description |
|
View all deferred vouchers |
Alt+v |
To access a window where you may view all the temporary and permanent vouchers for all vendors. See View All Deferred Vouchers |
|
Exit |
Alt+x |
To exit the screen. You may also use the <Esc> key |
Menu Selections
At the top left of the screen menu selections are available. Most of these are the same from screen to screen. Some of these selections may be restricted. If the menu selection is grayed out, then you will not be able to access it. The selections that are unique to this screen are explained here:
From the Print menu you may select the Pre-check writing report, Aged open items, Cash disbursement projections, Cash requirements, Open payables by date, Purchase journal, Purchases/Discounts, Vendor history, Vendor by vendor number and Vendor by vendor name.
From the Options menu you may View all deferred vouchers . In addition you may access other functions such as entering vendor notes, View Open Items and Viewing Vendor Invoices.
Once a vendor is selected that has open vouchers, the following buttons may be used.
Select this button to permanently defer a voucher from payment. If the voucher selected in the upper list box is already permanently deferred, the button is grayed out and cannot be selected.
Select this button to temporarily defer a voucher from payment. If the voucher selected in the upper list box is already temporarily deferred, the button is grayed out and cannot be selected.
You may view all the deferred vouchers by selecting the View all deferred vouchers button. When you do a screen like this displays:
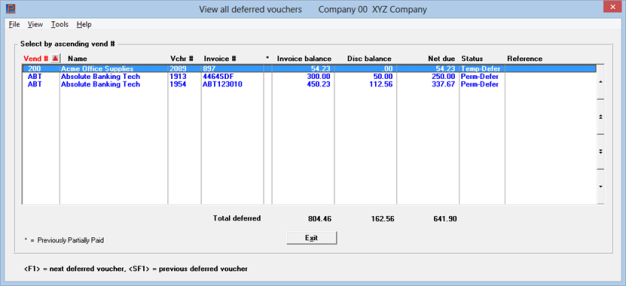
After you enter a valid vendor number, the vendor name, terms, and payment group are displayed.
* Voucher #
Options
This is the number of the voucher to be deferred from payment. The voucher number entered must match a voucher for this vendor in A/P Open Items. If the voucher has been previously deferred, the type of deferral is displayed. Enter the number, or use one of the options:
|
<F1> |
For this vendor’s next voucher |
|
<SF1> |
For this vendor’s previous voucher |
|
Format |
999999 |
|
Example |
Type 1188 |
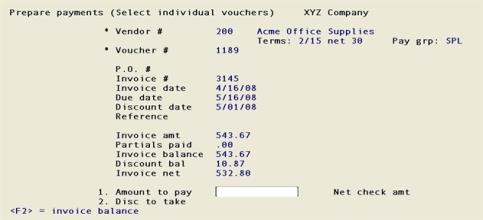
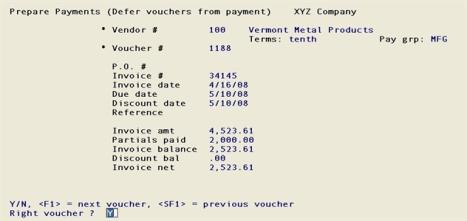
The information for the voucher now displays, and the screen looks like this:
Enter the following information:
Right voucher ?
Respond Y if it is the right voucher or N to select a different voucher for this vendor.
If you select Y and the next question appears:
Temporary Or Permanent Deferral?
Your choices are:
|
P |
For permanent deferral |
|
T |
For temporary deferral |
A permanently deferred voucher cannot be undeferred, but it can be selected again (using Select individual vouchers).
A permanently deferred voucher can be changed to temporary, and vice versa.
|
Format |
One letter, either T or P. The default is T. |
|
Example |
Press <Enter> |
Your entry into this field takes effect at once and the cursor is positioned at the *Vendor field to enter the next deferral.
If vouchers have been previously selected for payment or temporarily deferred from payment, this function clears such selections and deferrals. It does not clear permanent deferrals.
This function is usually run before Select a group of vouchers to clear selections and temporary deferrals or if an error was made in the selection process.
Running this clearing feature has no effect on the invoice or discount amounts for a voucher. The program sets the selection status of a voucher back to an unselected status so that the voucher does not appear on a check or ACH run until selected again at some later time.
Select
Clear selections / deferrals from the Prepare payments menu.
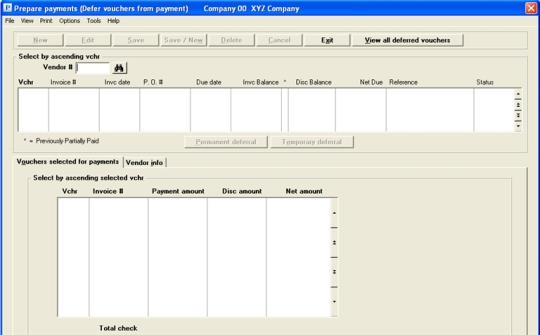
Graphical Mode
The following screen appears:
![]()
Menu Selections
At the top left of the screen menu selections are available. Most of these are the same from screen to screen. Some of these selections may be restricted. If the menu selection is grayed out, then you will not be able to access it. The selections that are unique to this screen are explained here:
From the Print menu you may select any of the following: Aged open items, Cash disbursement projections, Cash requirements, Open payables by date, Purchase journal, Purchases/Discounts, Vendor history, Vendor by vendor number and Vendor by vendor name.
Character Mode
The following screen appears:
![]()
Enter the following information:
Your answer determines whether all vouchers temporarily deferred from payment are set back to their regular (unselected and undeferred) status. If they are not cleared, they remain temporarily deferred.
|
Format |
Check box, checked is Yes and unchecked is No. The default is No. |
|
Example |
Press <Enter> |
Your answer determines whether vouchers previously selected for partial payment are returned to their unselected status. If not, they remain selected.
|
Format |
Check box, checked is Yes and unchecked is No. The default is No. |
|
Example |
Press <Enter> |
Your answer determines whether vouchers previously selected for full payment are returned to their unselected status. If not, they remain selected.
|
Format |
Check box, checked is Yes and unchecked is No. The default is No. |
|
Example |
Press <Enter> |
Make any needed changes. Press <Enter> and there will be a period of processing as selections and deferrals are cleared.
In order for a change to occur you must check a box to at least one of these fields.
Select
Pre-check writing report from the Prepare payments or Pre-check writing report from the Reports menu.
Graphical Mode
The following screen appears:
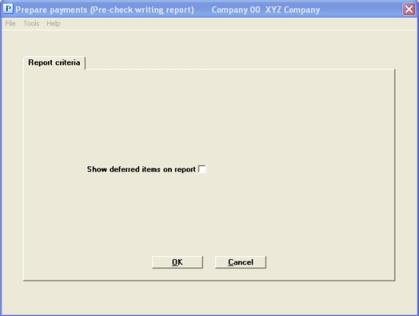
Before printing checks or processing the direct deposit ACH file, you should print this edit list. This report shows you exactly what vouchers you have selected for payment. It is a complete preview of your next payment run.
Menu Selections
At the top left of the screen menu selections are available. Most of these are the same from screen to screen. The selections that are unique to this screen are explained here:
From the Optionsmenu you may select to View open items (see View Open Items) and View vendor invoices (see Viewing Vendor Invoices).
Some of these selections may be restricted. If you are unable to access a menu selection, you do not have permission.
You have the choice to show deferred vouchers on this report. Deferred vouchers, however, are not included in the check totals shown.
|
Format |
Check box, checked is Yes and unchecked is No |
|
Example |
Select the <Space bar> to check the box |
Select OK to print or Cancel to return to the menu.
A sample of the Pre-Check Writing Report is available in the Sample Reports appendix. For each vendor, the information for each selected (or deferred) voucher is shown, including the amount to be paid, the discount to be taken, and the net-cash required. The net-cash required (which is the payment amount) is the amount paid minus the discount taken.
A check or ACH payment is made for a vendor only if the sum of the net-cash-required for all selected vouchers is greater than zero. The grand total of net-cash-required does not include vendors whose net-cash-required is negative.
After inspecting the edit list, you can make changes to selections or deferrals as necessary. Print another edit list. When all selections and deferrals of vouchers are correct, you are ready to print the checks.
The 1099 amounts that are reported using 1099 forms and magnetic media are accumulated in the A/P Federal Auxiliary file/table during posting. These amounts will be accumulated properly even if you do not have the correct year in A/P Control information. However, 1099 amounts in Vendors depend on the 1099 year ending date being correct in A/P Control information.
If the 1099 year ending date in Control information is more than one year after the invoice date you will see the following message on the report if you have selected a 1099 payable.
System date 09/11/16 greater than 1 year after 1099 year end date - 99/99/99. You should (Close year for 1099's) first. The 99/99/99 is substituted on the report with the actual control information date.
This message indicates that the distribution date entered on the payable is at least 1 year greater than the 1099 year ending date in A/P Control information. This means that you have not run Close year for 1099’s. If you continue to print and post the payment, the posting program updates the 1099 field for the vendor with an accumulation intended for a different year. See the Close Year for 1099s section of the Year-End chapter.
This selection may be used for the payment processes of printing checks or generating an ACH file. It can also do both during the same check run.
When you use this selection to print computer checks for the vouchers selected for payment it prints a check register and it posts checks.
When you use this selection to generate an ACH file for the vouchers selected for payment it prints a remittance form and creates an ACH file that may be sent to your bank for electronic payment.
If you are using positive pay, when printing checks you will be asked to select a format to generate a positive pay file.
Select
Print checks and post from the A/P menu.
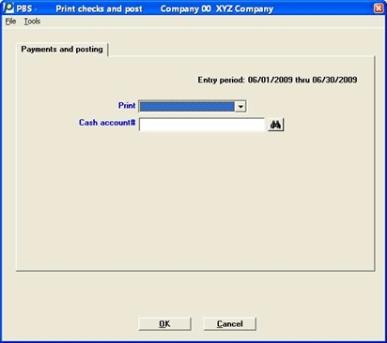
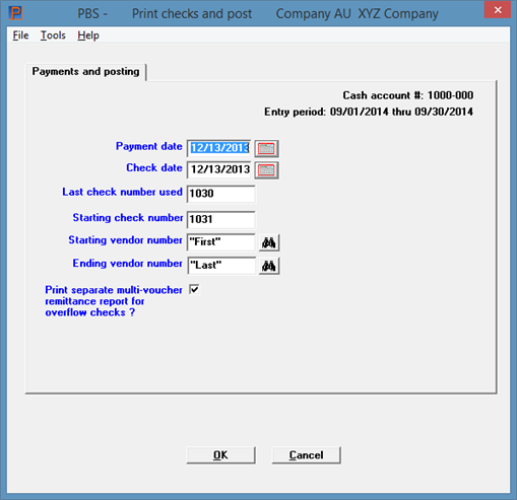
A screen appears for you to enter the following information:
This option will only display if you selected to generate a direct deposit ACH file as defined in A/P Control information to Generate ACH . Otherwise skip to the Cash account # field.
For more information on direct deposit ACH processing read the Direct Deposit Processing Introduction section of the appendix Implement Positive Pay and Direct Deposit.
Options
Enter one of the print selection options:
|
ACH only |
For direct deposit ACH processing only |
|
checks only |
For check processing only |
|
both checks and ACH |
For processing both direct deposit ACH and checks |
|
Format |
Drop down list |
|
Example |
Select checks only |
The check processing is documented here. Direct Deposit ACH File Processing is explained further down in this document.
The ACH pre-notification statuses are defined in the Direct Deposit Processing Introduction section from the appendix Implement Positive Pay and Direct Deposit.
The following occurs when you select to print checks and generate an ACH file both on the same run in relation to the pre-notification status on the vendor record:
| • | If the vendor pre-note flag is set to no, an ACH record is generated and no check is printed for this vendor. |
| • | If the vendor pre-note flag is set to yes a check is printed and no ACH record is generated for this vendor. |
The following occurs when you select to print checks only in relation to the pre-notification status on the vendor record:
| • | If the vendor pre-note flag is set to no the vendor’s payables will not be processed. |
| • | If the vendor pre-note flag is set to yes a check is printed and no ACH record is generated for this vendor. |
The following occurs when you select to process ACH only in relation to the pre-notification status on the vendor record:
| • | If the vendor pre-note flag is set to no the vendor’s payables will be processed. |
| • | If the vendor pre-note flag is set to yes the payables will not be printed. |
If you selected Both checks and ACH or checks only in the Print field or if you are not using ACH processing, this field displays:
If you are using only one cash account, this screen is skipped and the cash account in A/P Control information is used automatically.
Options
Enter the cash account for which to print checks, or use one of the options:
|
<F1> |
For the next entry in Cash accounts |
|
<SF1> |
For the previous cash account |
|
<F2> |
For the default cash account in A/P Control information |
|
Format |
Your standard account number format, as defined in Company information |
|
Example |
Press <F2> |
If you are using date controls, the entry period (from Control information) displays in the upper right area of the screen.
After you select the Enter key for the selected cash account, the check date format will display beneath the cash account name. The check format is set up in Cash accounts under CTL. The PBS System documentation has more information on this set up.
If you get a message “Invalid path to ????????” then the directory for creating the positive pay file does not exist. Verify that the path in your Bank record, found under CTL menu, matches a real folder on your system. The person that is making the payments must have permission to write this folder.
This field can be entered only if you you selected to Generate ACH (direct deposit) in A/P Control informationand selected Checks only for the Print field.
An ACH vendor is one that has ACH bank account information entered in Vendors.
Options
Enter one of the print selection options:
|
Checked |
Include vendors set up for ACH direct deposit along with non ACH vendors when printing checks. Checks are printed regardless of vendor ACH payment setup |
|
Unchecked |
Do not include ACH vendors in the check run |
|
Format |
Check mark |
|
Example |
Use the <Space bar> to check the box |
Please mount check forms on printer and check this box when done
If you are using a laser printer, load the check forms in the printer’s paper tray according to the instructions in the printer’s user manual.
If you are using dot matrix forms, mount the check forms on the printer with the perforation even with the top of the print head.
If you use checks preprinted with check numbers, note the first serial number of the checks you have mounted. The serial number is the number preprinted on the check, in contrast to the check number recorded in the software. You use this to ensure that the first and last check numbers are entered correctly.
|
Format |
Check box, checked is yes and unchecked is no |
|
Example |
Select the <Space bar> to check the box |
Printer Selection - With or Without Custom Forms
If you are NOT using a user defined custom check format, at this point you are then asked to select a printer, do an alignment and enter the number of copies. If you are using a custom form, you are asked to do these steps after entering the Form ID field. The example here assumes you are using a custom form. For printer selection details see the information starting at Printer selection
The following screen appears in graphical mode:
This screen displays in character mode:
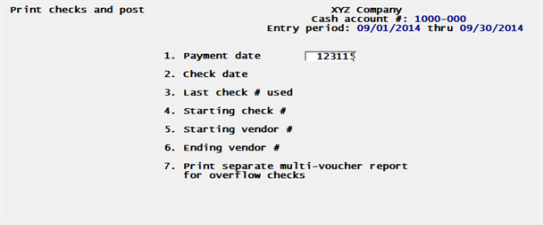
The selected cash account displays in the upper right. If you are using Date control, the entry period (from Control Information) displays below the cash account. Date control determines that the Check date field is within the entry period range. If not, a warning message displays.
This is the date used to calculate valid discounts.
In order for the discounts taken to agree with the valid discounts shown on the Cash Requirements Report and the edit list, this must be the same date as was used for those reports.
Options
You have the following option:
|
<F4> |
To select a date from the calendar lookup |
|
Format |
MMDDYY. The payment date last entered in Cash Requirements Report or Select a group of vouchers appears as the default, provided that one of these selections has been run previously. |
|
Example |
Press <Enter> |
Enter the date to be printed on the checks. This need not be the same as the payment date. You may use the option:
Options
You have the following option:
|
<F4> |
To select a date from the calendar lookup |
|
Note |
The payment date is used only to calculate valid discounts. It is the check date that is used for G/L distributions and all other postings. |
|
Format |
MMDDYY. The default is the payment date field. |
|
Example |
Press <Enter> |
|
Note |
The date format that prints on the check is variable and is based on the setup in Cash accounts or, if you are using a custom check format, it is based on the set up of the check date field. |
You may be warned or stopped against entering a date that is outside the allowed date range. For more information, read the Date Controls section of the Control information chapter.
If the 1099 year ending date in Control information is more than one year after the check date you will see the following message on the screen if you have selected a 1099 payable:
Check date greater than 1 year after 1099 yr end date. OK to continue ?
This message indicates that the distribution date entered on the payable is at least 1 year greater than the 1099 year ending date in A/P Control information. This means that you have not run Close a Year for 1099's. If you post the payment the posting program updates the vendor 1099 field regardless, for am amount intended for a different year. See Close Year for 1099s in the Year-End chapter for information on closing the 1099 year.
This field is entered in order to account for any check forms which have been used for manual checks since the last time computer checks were cut.
The check number displayed on the screen for last check # used is obtained from the appropriate cash account record in Cash accounts. This record was updated with the highest check number used the last time you cut computer checks.
If this check number is one less than the serial number on the first check form originally mounted on the printer, press <Enter>. Otherwise, enter a number which is one less than the serial number of the first check form you placed in the printer (prior to printing any test alignments.)
If you enter a check number greater than the displayed number, the intervening numbers appear on the check register as "Not accounted for".
For example, the number originally displayed is 157. The first serial number on the checks you mount on the printer is 162. You then print two alignment forms. You would enter 161 for last check # used as this number is one less than the serial number of the first check form you placed in the printer prior to printing any test alignments. The check register would then show that checks 158-161 are unaccounted for on this register. Checks numbered 162 and 163 are marked as void when the procedure for Starting check # is followed, as described below.
|
Format |
999999 The default is the last check number from Cash accounts. The format you enter here may be different that what is printed on the check. See the note below. |
|
Example |
Press <Enter> |
|
Note |
CAUTION WHEN VOIDING CHECKS DURING A/P PRINT CHECKS AND POST and Resetting the Check Number: If you are using Check Reconciliation, resetting the Cash accounts check number back to a smaller number will cause a data problem in the C/R checkbook. See Resetting the Check Number in Cash Accounts. |
|
Note |
Checks that voided during a check run are written to history with no vendor number and no voucher number. The reference is written as Voided at check run. |
Enter this field to ensure that the check number printed by the computer on the check form corresponds to the serial number on the check form.
If the number displayed here corresponds to the serial number of the check form that is currently mounted on the printer, press <Enter>. Otherwise, enter the serial number of the check form that is currently mounted on the printer.
If the starting check # is not one greater than the last check # used, the computer logs all checks between these numbers as void on the check register. These correspond exactly to the check forms used for test alignment.
Continuing the example from above, if you enter 161 for the last check # used, the computer displays 162 as the starting check number. However, since 2 test alignments were printed, the serial number of the check form that prints next is 164 (because the starting serial number was 162 and forms 162 and 163 were used for test alignments.) Thus, you would enter 164 for the starting check #. The computer logs checks 162 and 163 as void on the register. They will be written to the positive pay file as voided, if you selected to write void check numbers to the file. See the Entering Positive Pay File Forms section in the Positive Pay File Forms chapter.
|
Format |
999999 |
|
Example |
Press <Enter> |
Starting vendor number
Ending vendor number
Options
Enter the range of vendors to pay. Neither vendor is required to be entered, but the range should enclose at least one vendor. You may use the option:
|
<F2> |
For the First starting vendor or Last ending vendor |
|
<F8> |
For selecting a vendor from a list a vendors. From the vendor list window you may select the More info button to view the full data about the vendor. You may also access vendor history from the Options menu |
|
Format |
6 characters for each field |
|
Example |
Press <F2> for each field |
This field is only available if you entered the Check format to use field in A/P Control information as Forms. This means you have chosen to design or modify a form that fits your checks. See the Check and Remittance Forms chapter for more information on entering a check design.
Enter the form ID or use one of the options:
|
<F1> |
For the next form ID and form type |
|
<SF1> |
For the previous form ID and form type |
|
Format |
5 characters |
|
Example |
Does not occur because you are not using a custom form. |
(Form type)
This field is only available if you entered the check format in Control information as Forms. It can only be entered if you have both form types per the Form ID. Otherwise it defaults to the only type available.
There are two possible form types:
|
Checks top/bottom stub |
|
Checks top stub only |
If needed, enter the form type or use one of the options:
|
<F1> |
For the next form type |
|
<SF1> |
For the previous form type |
|
Format |
Drop down list |
|
Example |
Does not occur because you are not using Forms. |
Print separate multi-voucher remittance report for overflow checks ?
An overflow check means that there are too many vouchers to print on the check stub.
When this box is checked and you have more vouchers than will fit on the stub this occurs:
| • | After the checks have printed, you will be asked to select a printer for the Multi-Voucher Remittances. When the Print Multi voucher remittance printer selection screen displays, you may print it to a printer or print to disk. |
| • | The words See multi-voucher report for voucher details prints five times on both check stubs. |
With this box unchecked and you have more vouchers than will fit on the stub this occurs:
| • | One or more VOID zero-amount checks print with as many vouchers as will print on each stub. Check formats 1 and 2 will fit 14 vouchers per stub and check format 3 will fit 7 vouchers. The number of vouchers that fit on the Forms (check type) is variable as it is user definable. |
| • | The check payable amount prints on the last check for the vendor along with the last of the remaining vouchers. |
|
Format |
Check box, checked is yes and unchecked is no. The default is checked |
|
Example |
Select the <Space bar> to uncheck the box |
Make any needed changes. Press <Enter> or click on OK to print the checks.
The format of the resulting checks are controlled by your enter in the Check format to use field in Control information. Here is an explanation of the check formats:
Each check printed contains a check stub that shows each voucher paid by the check. Up to 14 vouchers can be printed on one check stub.
If more than 14 vouchers are being paid for 1 vendor, 14 vouchers are shown on the first stub, what happens depends on the Print separate multi-voucher remittance report for overflow checks ? setting.
Each check printed contains a check stub that shows each voucher paid by the check. Up to 7 vouchers can be printed on one check stub.
If more than 7 vouchers are being paid for 1 vendor, 7 vouchers are shown on the first stub, what happens depends on the Print separate multi-voucher remittance report for overflow checks ? setting.
Check formats 1, 2, and format 2 with reference
After the last voucher is listed, the check is printed for the total amount due to that vendor. Only one check is printed per vendor.
Checks are not printed for vendors whose total balance for the vouchers selected is negative, or if the vendor’s status is H or Hold payment (in Vendors). See Vendor status in the Vendors chapter.
Zero balance checks are printed so that vouchers that balance to zero can be removed from A/P Open Items.
This format is multi-use check. The same check forms can be used for both Accounts Payable and Payroll, cutting down on overhead expense.
The check stub of the multi-use check form is blank. The new check format is used to process the blank check stub.
The format is similar to an existing format in both look and processing.
This is a user designed check format. See the Check and Remittance Forms chapter for more information on designing your own check and check stub.
Print alignment?
Select the Space bar to insert a check mark to print a test alignment (a form filled out with lines of X’s and 9’s) to verify the correct position of the paper. You can repeat this process if you have to fine-tune the printer adjustment. For a laser printer, the previous screen is re-displayed each time you print a test alignment. For a non-laser printer you are assumed to have adjusted the printer manually.
When you are through printing alignment forms, note the serial number of the first check that is actually printed.
After mounting the check forms, you are asked to select a printer.
It is recommended that you do not select Windows printer when printing checks to a dot matrix printer because the performance may be slow and the alignment of the data to the form may produce undesirable results.
Printing a Windows printer alignment to a laser printer has limitations as well. If you cannot get the data to align to the form this way, we recommend using a laser printer set up in Company information. If printing checks with Windows printer, the alignment starts from the upper left corner of the printable area as pre-defined by the printer driver on your workstation. You cannot print above or to the left of this area on the page.
Company information - Laser printers-alignment
If printing checks with a laser printer as defined in Company information, you are first asked to enter an Up/down adjustment and Left/right adjustment amounts to adjust the alignment of the laser printer. The values last entered for these amounts are shown. Enter new values or accept the values shown.
|
Note |
Laser printers that support PCL codes allow the alignment feature. Use the up/down and left/right adjustments for laser alignment to position the check information so that it exactly aligns with the preprinted form. The preprinted check forms are produced according to very exact specifications, but the print position of laser printers may vary slightly from model to model or between manufacturers. These adjustment amounts allow you to compensate for the differences between laser printers so that your check information can be positioned correctly on the check form. Windows only printers are printers that do not support PCL codes. For this reason you may not be able to do a proper alignment with such a printer and you will have to get a Laser printer that supports PCL. |
You can save check forms by printing the alignment on plain paper. After printing the alignment on plain paper, place the plain paper on top of one of the preprinted check forms and hold them up to a bright light to verify the alignment. Make any adjustments necessary and continue printing alignments on plain paper until you have the correct alignment. Then load the preprinted check forms in the paper tray before answering No (unchecked) to Print alignment?.
Laser printers - number of copies
If you are printing checks with a laser printer, you are asked to enter the number of copies and the labels for each copy. Leave the Label for 1st part field blank if you do not want to print a label on the original copy of the check.
Are the checks just printed OK ?
After checks are printed, you are asked this question.
If all of the checks printed are bad, select No when you are first asked if the checks just printed are correct. You are asked if you want to void all checks on this run. If you answer Yes, all checks are voided and you are returned to the selection screen.
If some of the checks just printed are correct, you should answer Yes when you are first asked if the checks just printed are correct. You can then reprint selected checks and the software automatically voids the first check that had been printed in each case.
If you do not have time to reprint some bad checks right away, you might want to void all checks and then re-select vouchers at a later time.
|
Format |
Yes/No question |
|
Example |
Select Yes to continue |
When you answer Yes, all the checks are considered to be correct and you are returned to the selection screen. If you answer No, the following question appears:
OK to void all checks printed on this run ?
If you select No, you are returned to the selection screen.
If you select Yes, all checks are voided. You are informed of the individual checks by number. Once all checks have been processed, press <Esc> to return to the selection screen.
|
Format |
Yes/No question |
|
Note |
Checks that voided during a check run are written to history with no vendor number and no voucher number. The reference is written as Voided at check run. CAUTION: If using Check Reconciliation, when you transfer check data to C/R and you reset the check number using Cash accounts, see Resetting the Check Number in Cash Accounts |
Print more checks/Done printing checks
Print another set of checks in the same way as the first set by selecting the Print more checks button, or press <Esc> or select the Done printing checks button if there are no more checks to be printed.
If you select to print the same checks again, it will void the original checks you printed.
|
Format |
(See Field #1 above) |
|
Example |
Press <Esc> |
At this point you have printed one or more sets of checks, each set corresponding to one selection screen. For each set you have had the opportunity to void that entire set. Now you have pressed <Esc> to indicate there are no further sets to be printed. You are given another chance to void any checks spoiled the printing process, and this time you can select ranges of check numbers.
It is preferable to void spoiled checks before they are posted. Once checks are posted, a separate selection is required to void a check.
If you answer No, proceed to Are the checks OK to post? below.
If you answer Yes, you can void one or more ranges of checks (regardless of whether or not they were printed in the same set).
|
Format |
Yes/No question |
|
Example |
Select <No> |
Starting check #
Ending check #
These fields appear only if you answered Yes to the preceding. Enter the range of check numbers to be voided.
|
Format |
999999 at each field |
|
Example |
(Does not occur in this example) |
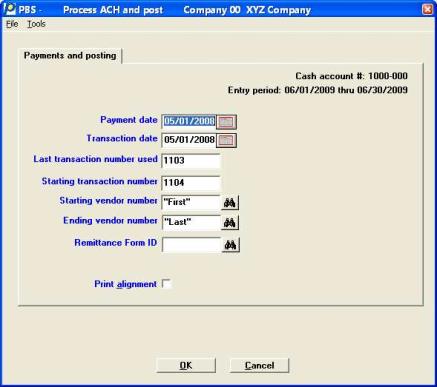
Direct deposit processing is only available if you set it up according to the appendix Implement Positive Pay and Direct Deposit.
If you selected A ACH only in the Print field.Process ACH and post displays in the graphical mode title bar or in the character mode upper left corner of the screen. If you selected both checks and ACH, you will print checks first before you get to the processing of ACH direct deposit.
A screen appears for you to enter the following information:
If you are using only one cash account, this field is skipped and the cash account in A/P Control information is used automatically.
The same or different cash account may be used as for printing checks. However, this account must be defined in Banks found under the CTL menu.
Options
Enter the cash account for which to generate a direct deposit ACH file, or use one of the options:
|
<F1> |
For the next entry in Cash accounts |
|
<SF1> |
For the previous cash account |
|
<F2> |
For the default cash account in A/P Control information |
|
Format |
Your standard account number format, as defined in Company information |
|
Example |
Press <F2> |
If you are using date controls, the entry period (from Control information) displays in the upper right.
If you get a message “Invalid path to ????????” then the directory for creating the ACH file does not exist. Verify that the path in CTL Banks matches the directory on your system.
After you select the Enter key for the selected cash account, the bank name will display beneath the cash account name. The bank is set up in Banks under CTL. The PBS System User manual has more information on this set up.
Any change?
Respond Y to re-enter the Cash account # field, or N to continue.
Please mount remittance forms on printer and check this box when done
Mount the remittance forms on the printer when using a laser printer by loading the check forms in the printer’s paper tray according to the instructions in the printer’s user manual.
If using a dot matrix printer load the form with the perforation even with the top of the print head. It is recommended that you do not select Windows printer if you are using a dot matrix printer. Performance may be slow and the alignment of the data to the form may produce undesirable results.
|
Format |
Graphical mode: Check box where checked is yes and unchecked is no Character mode: Four characters |
|
Example |
Type DONE when ready |
Then the following screen will display:
In character mode the following screen displays:
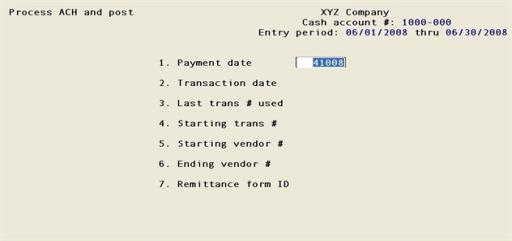
The selected cash account displays in the upper right. If you are using date controls, the entry period (from Date control) displays below the cash account. The date controls will determine if entry in the Payment date field is within the entry period range.
This is the date used to calculate valid discounts.
In order for the discounts taken to agree with the valid discounts shown on the Cash Requirements Report and the edit list, this must be the same date as was used for those reports.
Options
You have the following option:
|
<F4> |
To select a date from the calendar lookup |
|
Format |
MMDDYY. The payment date last entered in Cash Requirements Report or Select a group of vouchers appears as the default, provided that one of these selections has been run previously. |
|
Example |
Press <Enter> |
Enter the date to be printed to be written to the direct deposit ACH file. This need not be the same as the payment date.
|
Note |
The payment date is used only to calculate valid discounts. It is the transaction date that is used for G/L distributions and all other postings to the checks, open items and may be printed on the remittance advice form. |
Options
You have the following option:
|
<F4> |
To select a date from the calendar lookup |
|
Format |
MMDDYY. The default is the payment date in Field #1. |
|
Example |
Press <Enter> |
This field can be printed on the remittance advice.
Date Range Control
If you are using date entry controls, you may be warned or stopped against entering a date that is outside the allowed date range. For more information, read the Date control section of the Control information chapter.
1099 Date Control
If the 1099 year ending date from the Company information 1099 year ending date field is more than one year after the check date you will see the following message on the screen if you have selected a 1099 payable.
Check date greater than 1 year after 1099 yr end date. OK to continue ?
The 99/99/99 is substituted on the report with the actual control information date.
This message indicates that the distribution date entered on the payable is at least 1 year greater than the 1099 year ending date in A/P Control information. This means that you have not run Close Year for 1099s. If you post the payment you update the vendor 1099 field with an amount intended for a different year. See Close Year for 1099s from the Year end chapter.
The transaction number displayed on the screen for Last trans # used is obtained from the appropriate cash account record in Cash accounts. This record was updated with the highest transaction number used the last time you generated ACH records.
If you enter a transaction number greater than the displayed number, the intervening numbers appear on the ACH register as Not accounted for.
|
Format |
999999 The default is the last transaction number from Cash accounts. |
|
Example |
Press <Enter> |
If the number displayed here corresponds to what you expect, press <Enter>. Otherwise, enter the starting direct deposit ACH payment transaction number.
|
Format |
999999 |
|
Example |
Press <Enter> |
Starting vendor number
Ending vendor number
Enter the range of vendors to pay. Neither vendor is required to be entered, but the range should enclose at least one vendor. You may use the option:
Options
|
<F2> |
For the First starting vendor or Last ending vendor |
|
Format |
6 characters for each field |
|
Example |
Press <F2> for each field |
Enter the form ID or use one of the options:
|
<F1> |
For the next remittance Form ID |
|
<SF1> |
For the previous remittance Form ID |
|
Format |
5 characters |
|
Example |
Press <F1> for the form |
Select the <Space bar> to fill in a check mark to print a test alignment (a form filled out with lines of X’s and 9’s) to verify the correct position of the paper. You can repeat this process if you have to fine-tune the printer adjustment. For a laser printer, the previous screen is re-displayed each time you print a test alignment. For a non-laser printer you are assumed to have adjusted the printer manually.
Make any needed changes. Press <Enter> or click on the OK button to print the remittances.
Select a Printer
You are then asked to select a printer.
Enter number of copies to print
If you are printing checks with a laser printer, you are asked to enter the number of copies and labels for each copy. Leave the Label for 1st part field blank if you do not want to print a label on the original copy of the check.
Did any of the remittance advices print OK ?
After the remittance advice forms are printed, you are asked this question.
If all of the remittances printed are bad, answer No. You are asked if you want to void all remittances on this run. If you answer Yes, you are returned to the screen where you can print more remittances.
|
Format |
Select a Yes or No button |
|
Example |
Answer Yes |
If you answer Yes, all the payments are considered to be correct and you are returned to the selection screen. If you answer No, the following question appears:
At this point you have processed one or more sets of direct deposit payments, each set corresponding to one selection screen. For each set you have had the opportunity to void that entire set. Now you have pressed <Esc> to indicate there are no further sets to be processed. You are given another chance to void any remittances and this time you can select ranges of transaction numbers.
It is preferable to void remittances before they are posted and before the ACH file is generated. Once payments are posted, a separate selection is required to void an ACH payment and the ACH file will have to be manually deleted. For the location of the ACH file Banks under CTL.
If you have already sent the ACH file to your bank, it may be too late to void the payments. Contact your bank representative as soon as possible to determine the status of the electronic payments.
If you answer No, proceed to Are the remittances OK to post? below.
If you answer Yes, you can void one or more ranges of remittances (regardless of whether or not they were processed in the same set). If you are automatically transfering payment data to Check Reconciliation, see Resetting the Check Number in Cash Accounts.
|
Format |
Check mark, checked is yes and unchecked is no |
|
Example |
Select the <Enter> key for the default of no |
Starting transaction number
Ending transaction number
These fields appear only if you answered Yes to the preceding. Enter the range of direct deposit remittance transaction numbers to be voided.
|
Format |
999999 at each field |
|
Example |
(Does not occur in this example) |
A page displays indicating that Voiding is complete.
Select Esc or Cancel to continue.
Are the remittances ok to post ?
This question is asked after you have chosen not to void remittance payments, or after you have voided some but not all remittance payments.
If you answer No, you are returned to the selection screen. If you answer Yes, there will be a period of processing as checks are posted.
|
Format |
One letter, either Y or N |
|
Example |
Answer Y to Are checks OK to post? |
Please mount regular paper on printer and check this box when done
Restore stock paper on the printer. This step is required before printing the A/P ACH Register.
|
Format |
Check box, checked is yes and unchecked is no |
|
Example |
Select the <Space bar> to check the box |
Register printer selection
Select a printer for the ACH register. This choice appears even if you only have one printer, since the register (unlike the checks themselves) can be printed to disk. You may not choose Display on screen, or Create HTML and you may not <Esc> out of the printer selection window because printing a register is mandatory.
A message displays indicating Posting complete. Select OK to continue.
The check register lists all computer-printed checks cut on this check printing run. Checks not accounted for (described earlier in this chapter) are listed, as well as checks which have been voided during the check printing process. The check register will print both checks and ACH payments.
The A/P ACH register lists the vendor payments generated in the ACH file during the Process direct deposit and post procedure.
All manual or non-A/P checks for all cash accounts are also printed on this register, if they have not been shown on a previous check register. If you want to have these checks shown on a separate check register, use the selection Check register from the Reports menu prior to processing computer checks.
After the register is printed, the checks and ACH transactions are posted to A/P Open Items, the A/P Distributions to G/L, Vendors, and Vendor History (if used).
Transfer to Check Reconciliation
The checking account used for posting the check and direct deposit must be set up in Check Reconciliation in Checking accounts.
Per the Check Reconciliation Control information you may be setup to automatically post to the C/R Check Book (CKBOOK). When you are automatically posting to Check Reconciliation, the Check Register will indicate "Checks automatically transferred to Check Reconciliation".
If you are not setup to automatically post, you must run the Transfer checks/deposits function on the C/R menu to pull the data into Check Reconciliation.
Non-A/P checks are transferred to C/R when posting payables.
If any vouchers were temporarily deferred for this check printing run, you are asked whether you want to clear them. Answer Yes to allow these vouchers to be selected in the future, or No to leave them deferred. Permanently deferred vouchers are unaffected.
|
Note |
If a check number in the range matches another check that was already posted, it will show as void on the A/P Check Register, but will not replace the valid check that is already in Vendor History. (If you are not keeping Vendor History, this does not apply.) |
When checks are voided before posting, it is almost always because they were spoiled in the print process. There are various reasons why you might want to void a check after it has been printed and posted. The check might have been issued to a vendor whose invoices are in dispute, it might have been accidentally sent to the wrong vendor, it might have been issued prematurely, and so on.
|
Note |
Direct deposit transactions may not be voidable after submitting the ACH file to your bank. Before entering a void, contact your bank and verify that the payment has not been fully processed and deposited to your vendor's bank account. |
If you are using Vendor History, voiding such checks is simple because all the information you need to undo the posting is still available in Vendor History and can be retrieved. All you have to do is use Void Checks.
If you are not using Vendor History, voiding such computer checks requires more work. The steps needed are:
| • | First create a suspense account. This is a G/L account used for posting adjusting entries. (It is the same thing as a clearing account as defined previously). |
| • | Next create a non-A/P check voucher Type in Payables, as follows: |
Use the exact information that was used when the check was printed and posted. (For instance, suppose you are voiding a check that was issued to pay off an A/P open item of $100.00, where the discount taken was $2.00, and the check amount was $98.00.)
Then on the non-A/P check voucher, use the same check number and vendor number that was on the computer check. Enter the total amount of the invoice as a negative number (-$100.00, in this instance) and enter any discount that was taken, also as a negative amount. Enter the full expense distribution as a negative amount to the suspense account.
If the check is being voided in the same accounting period in which the check was originally cut, use the original check date.
If the check is being voided in a later accounting period, use the date on which the check was voided.
| • | Post the non-A/P check voucher. Since this is a non-A/P check voucher, the A/P account is unaffected. However, the credits that were made to the cash account and discount account because of the bad check are reversed by the negative amounts entered above. |
The expense distribution is temporarily recorded as a negative amount in the suspense account, and the year-to-date purchases and discounts for the vendor are reduced.
| • | To now restore the original open item and correct the A/P account so it will contain the amount of the open item once again, enter and post a regular voucher for this vendor. Date it with the same date as the original voucher and distribute the entire amount to the suspense account (to counter-balance the negative amount that is there temporarily). |
Once the above steps have been done, the voucher can then be selected for payment again.
This optional selection prints a check register for manual and non-A/P checks only.
Do not use this selection if you want such checks included on the same register as your computer checks (and posted at the same time).
Any checks that appear on this register do not reappear on a subsequent regular A/P Check Register. Conversely, if you have just run Print checks and post there will be nothing left that this selection can print.
|
Note |
When automatically interfaced to Check Reconciliation non-A/P checks get transferred to the C/R Check Book (CKBOOK) when posting checks and direct deposit payments. When not auto-interfaced use the C/R Transfer checks / deposits selection to transfer them. |
Select
Non-A/P Manual check register from the Reports menu.
No selection screen appears as all manual and non-A/P checks are printed unconditionally. You will be asked to select a printer as usual.
When printing checks using Print checks and post and the checks were not in the printer you will need to print the checks again. This would also apply when printing direct deposit remittances and using preprinted forms.
If you do not want to throw away the checks, you may reset the check number back to the number before you printed and voided the checks at the end of the Print checks and post process. You may reset the Last check # this using CTL > Cash accounts. Enter the Last AP ACH # if resetting the direct deposit remittance number.
CAUTION if using Check Reconciliation
The check numbers are not actually voided as you are going to use them. If you have Check Reconciliation installed, the checks will be posted twice to the checkbook. This will cause a data problem in the C/R checkbook. How to handle this depends on the type of transfer method you use:
Automatic Transfer
Using the automatic transfer method, you must delete the voided checks in C/R, using Load checkbook, before you run Print checks and post again. Failing to do this will result in incorrect data in C/R.
Transfer checks/deposits
If you use the C/R Transfer checks/deposits to move data to the checkbook, you should transfer the voids first and then delete the voids before running Print checks and post again with the same check numbers. Use C/R Load checkbook to delete the voids. Failing to do this may result in incorrect data in C/R.